RK3399上Tengine平台搭建
Tengine&RK3399介绍
Tengine
Tengine 是OPEN AI LAB 为嵌入式设备开发的一个轻量级、高性能并且模块化的引擎。
Tengine在嵌入式设备上支持CPU,GPU,DLA/NPU,DSP异构计算的计算框架,实现异构计算的调度器,基于ARM平台的高效的计算库实现,针对特定硬件平台的性能优化,动态规划计算图的内存使用,提供对于网络远端AI计算能力的访问支持,支持多级别并行,整个系统模块可拆卸,基于事件驱动的计算模型,吸取已有AI计算框架的优点,设计全新的计算图表示。
RK3399
Firefly-RK3399 | Firefly
Firefly-RK3399资料下载 | Firefly
作为Firefly新一代的顶级开源平台,Firefly-RK3399采用了六核64位“服务器级”处理器Rockchip RK3399,拥有2GB/4GB DDR3和16G/32GB eMMC, 并新增DP 1.2、PCIe 2.1 M.2、Type-C、USB3.0 HOST等高性能数据传输和显示接口。Firefly-RK3399强大的性能配置将给VR、全景拍摄、视觉识别、服务器、3D等前沿技术带来里程碑的变革。
RK3399系统烧录
系统烧录是玩开发板重要的一步,学会如何为开发板烧录系统,就可以无所畏惧地瞎捣鼓——玩坏了大不了就重刷系统!
参考RK3399资料 | Firefly论坛
- 下载烧录工具和系统镜像
烧录工具下载地址 | 百度云
系统镜像下载地址 | 百度云
系统镜像选择Firefly-RK3399-ubuntu16.04-20180416112819,下载下来是一个tar压缩包,解压后得到一个img镜像文件;
烧录工具的压缩包解压后包含一个AndroidTool的烧录工具以及一个DriverAssitant驱动程序; - 按照USB驱动
解压DriverAssitant_v4.5的压缩包,运行其中的Driverinstall.exe程序,点击“驱动安装”,按照步骤安装即可;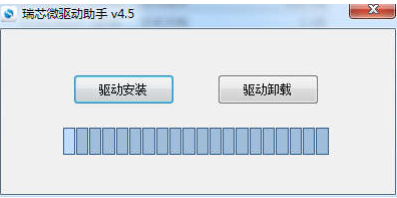
- 使RK3399进入升级模式
用USB线连接PC和RK3399,Type-A端接PC,Type-C端接RK3399;
RK3399断电,按住RECOVERY键并接上电源(或在通电情况下,按住RECOVERY然后轻按RESET重启),保持两三秒后松开RECOVERY键,此时启动PC的设备管理器(快捷键Win+X,可以找到设备管理器入口),如果看到多出一个Class for rockusb devices设备说明RK3399成功进入升级模式 - 系统烧录
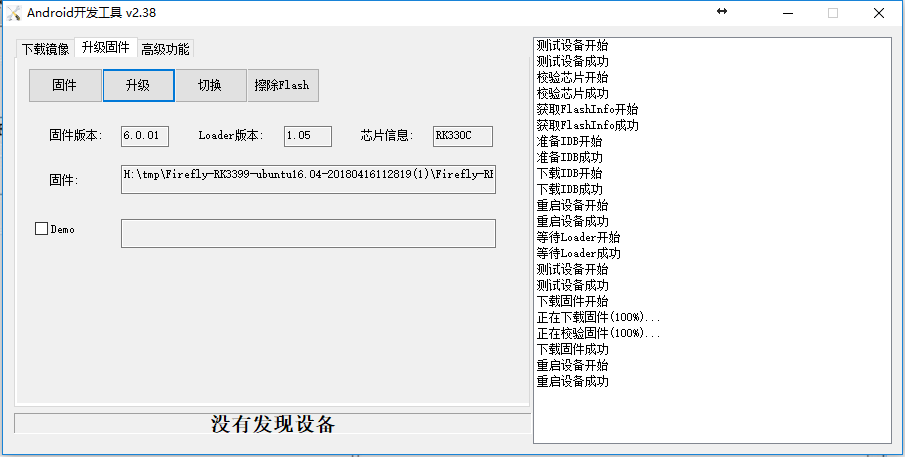
运行AndroidTool.exe,切换到“升级固件”选项卡,点击“固件”并选择下载的镜像文件(扩展名为.img),然后点击“升级”开始烧录,右边的log会输出相关的信息,直到“下载固件成功”以及“重启设备成功”说明成功完成烧录。
RK3399远程访问
有时候专门为RK3399外接显示器和键鼠不大方便,我们可以通过ssh或vnc来远程访问;
首先让RK3399连接上网络(有线或无线),然后快捷键ctrl+alt+t呼出终端,输入指令ifconfig查看当前的网络配置——

其中
eth0和wlan0分别是有线和无线网络的配置信息,我这里连接的是无线网,可以看到wlan0下有一项inet addr,这是设备在无线网络上的ip地址,把后边这串地址192.168.50.176记下来待会用得上。(如果你接的是有线网络,那么也可以在eth0下找到相应的inet addr地址)推荐一个非常实用的免费远程连接工具:MobaXterm
ssh
烧录的系统镜像本身自带一个ssh服务器openssh-server,不需要我们额外安装。直接打开MobaXterm,点击左上角的Session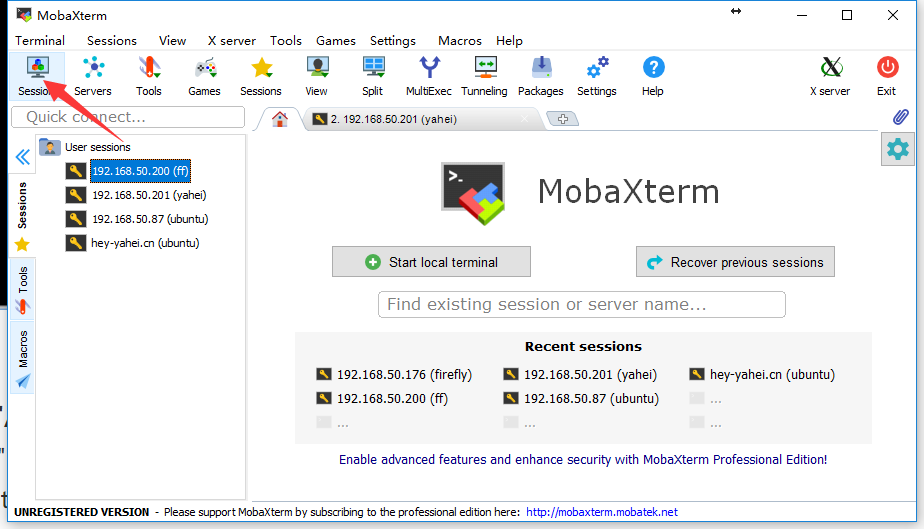
按照下图进行配置——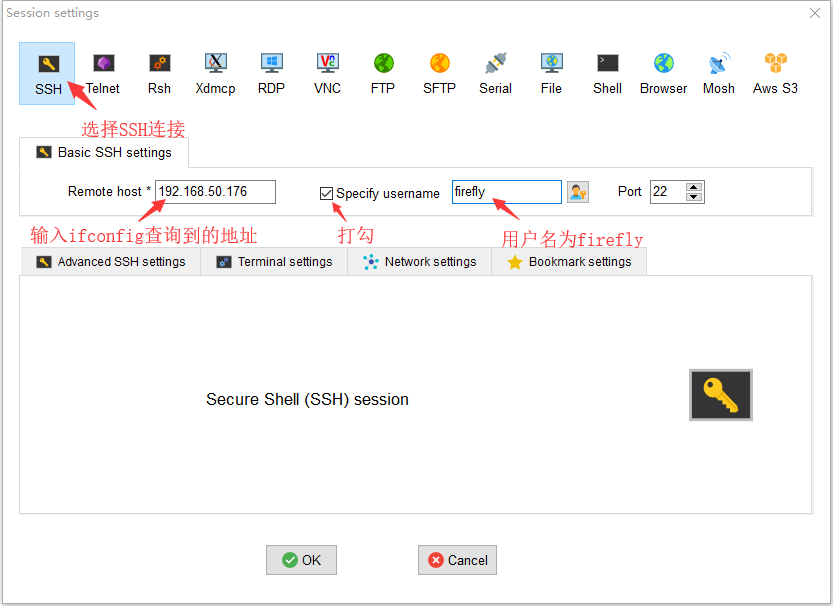
配置完就可以通过远程连接到RK3399的终端上——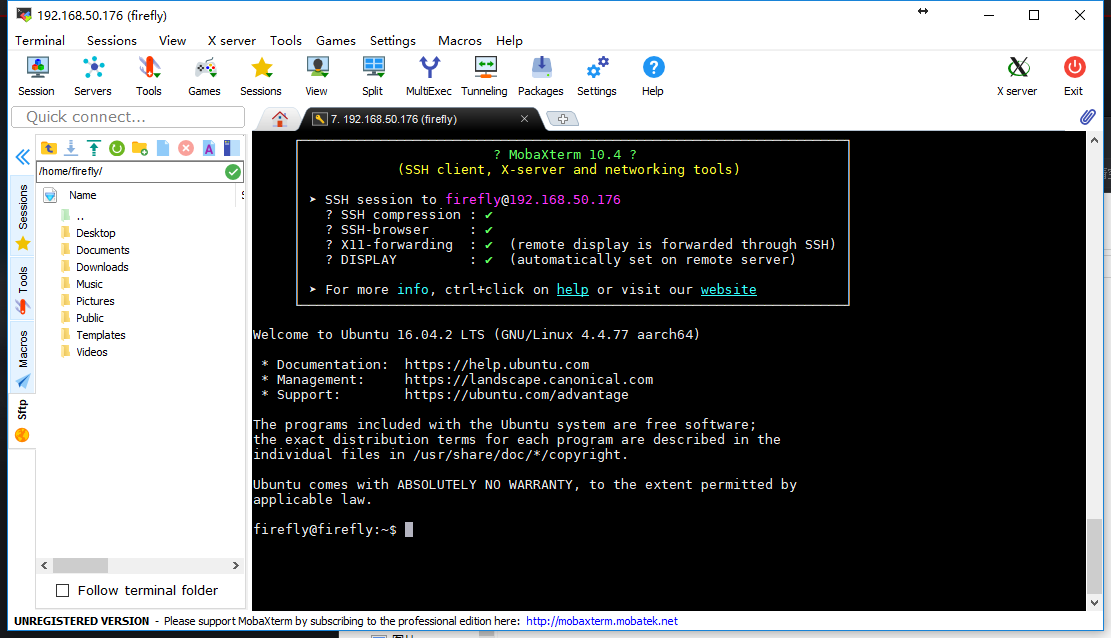
既可以直接在PC上远程执行指令,也可以方便地在PC和RK3399之间传输文件。
vnc
ssh只能连接到RK3399上的纯文本模式的终端,如果你需要进一步控制RK3399的界面,可以额外安装vnc服务;
打开终端,刷新apt源:
sudo apt-get update
安装x11vnc:
sudo apt-get install x11vnc
为vnc服务生成密码(按照提示输入密码,并写入文件):
x11vnc -storepasswd
添加服务:
sudo vim /lib/systemd/system/x11vnc.service
为x11vnc.service添加以下内容然后保存:
[Unit]
Description=Start x11vnc at startup.
After=multi-user.target

[Service]
Type=simple
ExecStart=/usr/bin/x11vnc -auth guess -once -loop -noxdamage -repeat -rfbauth /home/firefly/.vnc/passwd -rfbport 5900 -shared

[Install]
WantedBy=multi-user.target
加载服务:
sudo systemctl daemon-reload
启动服务:
sudo service x11vnc start
设置开机自启动:
sudo systemctl enable x11vnc.service
这样一来RK3399上的vnc服务就设置完毕,接下来直接用MobaXterm远程控制桌面;
和ssd一样点击左上角的Session选项,切换到vnc选项卡,如下图配置: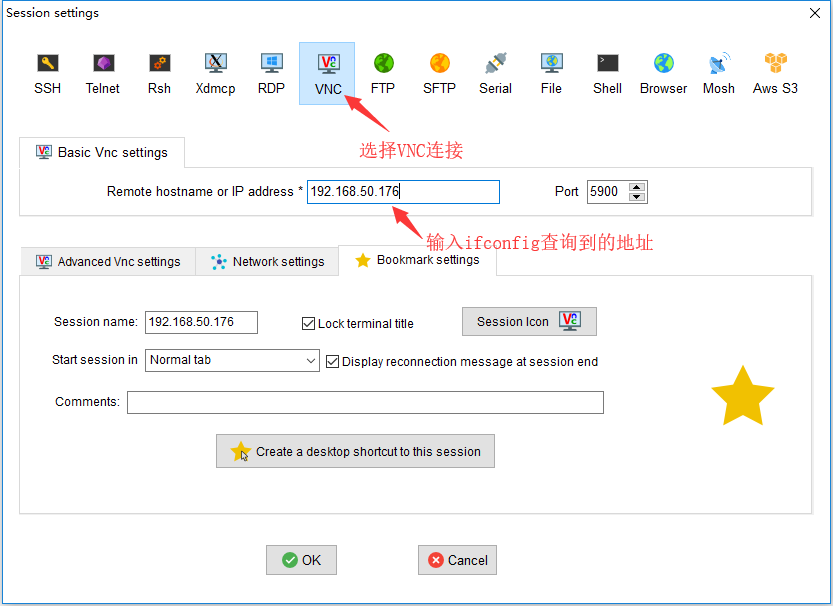
配置完毕后双击并输入刚刚在RK3399上设置的密码就可以远程控制桌面~~
安装Tengine
RK3399的基本环境安顿好之后,接下来可以开始搭建Tengine的环境。
- 安装git
sudo apt-get install git - 用git下载源码
git clone https://github.com/OAID/tengine - 安装编译源码时需要依赖的包
sudo apt install libprotobuf-dev protobuf-compiler libboost-all-dev libgoogle-glog-dev libopenblas-dev libopencv-dev - 进入Tengine目录,复制编译的配置文件
cd ~/tengine cp makefile.config.example makefile.config - 编辑
makefile.config文件(如果不需要修改配置,可以直接忽略这一步)
后续需要用到MobileNet SSD网络,其中包含维度交换的vim makefile.configPermute层,该层是ACL暂时不支持的,所以这里暂时不建议开启ACL支持 - 编译
 make
 make install
小试牛刀:运行Tengine自带的Demo
Tengine配置完毕,接下来我们试着运行Tengine自带的几个Demo。
分类网络SqueezeNet和MobileNet
- 运行SqueezeNet
./build/tests/bin/bench_sqz -r1——(-r1 代表重复次数) - 运行MobileNet
./build/tests/bin/bench_mobilenet -r1——(-r1 代表重复次数)
运行后即可在终端看到输出结果。
目标检测网络MobileNet SSD
Mobilenet_SSD implementation with Tengine | github
在example目录下有一个mobilenet_ssd的子目录,一般情况下在目录执行
cmake .
make
就可以编译目录下的程序,然而……
好吧,烧录的系统上没有cmake,安装一下:
sudo apt-get install cmake
不过make的时候又报了错——
看起来是找不到tengine的头文件,打开CMakeLists.txt文件瞧瞧,开头部分是这样的——
cmake_minimum_required (VERSION 2.8)
project(MSSD)

set( INSTALL_DIR ${TENGINE_DIR}/install/)
set( TENGINE_LIBS tengine)

...
好像这里引用了一个变量TENGINE_DIR但却没有提前指定,我们给它设置一下,变为——
cmake_minimum_required (VERSION 2.8)
project(MSSD)

set( TENGINE_DIR /home/firefly/Tengine )
set( INSTALL_DIR ${TENGINE_DIR}/install/)
set( TENGINE_LIBS tengine)

...
再make一下,头文件是找到了,但printf好像有点问题——
打开源代码mssd.cpp,添加头文件#include <stdio.h>
搜索一下prinf,如果printf前有std::就去掉(也就是把std::printf替换为printf),保存后再make一下……诶!通过了~~
运行一下./MSSD

ummmm没有模型文件,下载一个!
Tengine提供了一些训练好的模型——Tengine_models | 百度云(提取码:57vb)
找到mobilenet_ssd文件夹把其中的MobileNetSSD_deploy.prototxt和MobileNetSSD_deploy.caffemodel下载下来放到./models目录下就行,再运行一下./MSSD——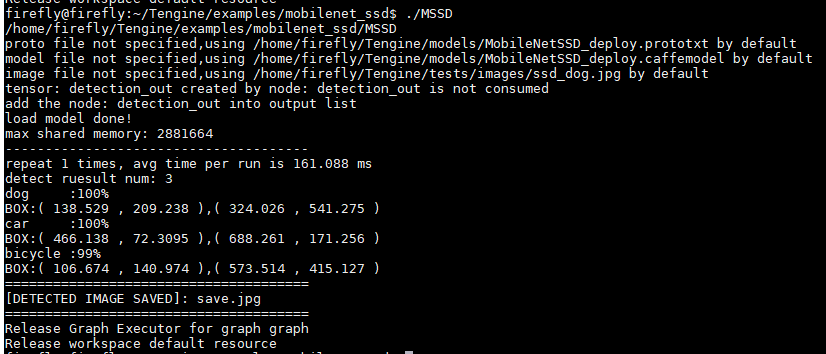
没报错,有结果,好了,收工!
等等,这些输出什么意思呢?
- 从prototxt文件里读出模型
proto file not specified,using /home/firefly/Tengine/models/MobileNetSSD_deploy.prototxt by default - 从caffemodel文件里读出模型参数
model file not specified,using /home/firefly/Tengine/models/MobileNetSSD_deploy.caffemodel by default - 读一张
ssd_dog.jpg的文件作为输入
image file not specified,using /home/firefly/Tengine/tests/images/ssd_dog.jpg by default
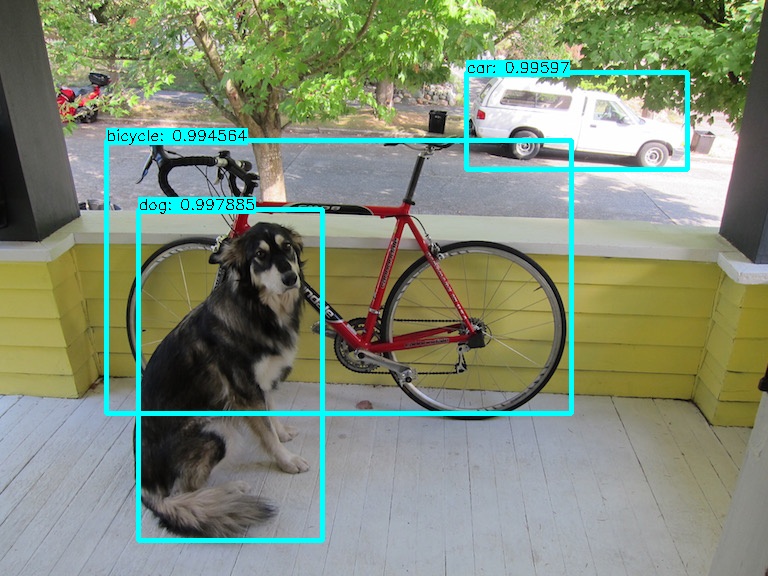
这张图片长这样:
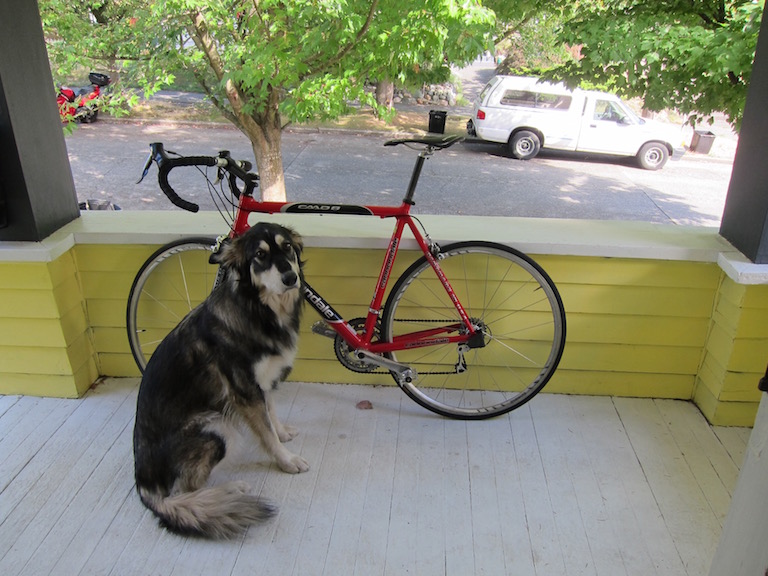
- 检测出了三个物体:
分别是狗、小车、自行车,用时161.088msrepeat 1 times, avg time per run is 161.088 ms detect ruesult num: 3 dog :100% BOX:( 138.529 , 209.238 ),( 324.026 , 541.275 ) car :100% BOX:( 466.138 , 72.3095 ),( 688.261 , 171.256 ) bicycle :99% BOX:( 106.674 , 140.974 ),( 573.514 , 415.127 ) - 最后图片输出到了
save.jpg
[DETECTED IMAGE SAVED]: save.jpg
这张图长这样:
啊就输入一张图片,输出检测好框好图片的结果。好没意思~改成动态检测的吧!
以下是修改后的源码,改动也不大,就是调用摄像头获取图片,处理完之后再输出显示(在RK3399上FPS大概为5-6)。
/*
 * Licensed to the Apache Software Foundation (ASF) under one
 * or more contributor license agreements.  See the NOTICE file
 * distributed with this work for additional information
 * regarding copyright ownership.  The ASF licenses this file
 * to you under the Apache License, Version 2.0 (the
 * License); you may not use this file except in compliance
 * with the License.  You may obtain a copy of the License at
 *
 *   http://www.apache.org/licenses/LICENSE-2.0
 *
 * Unless required by applicable law or agreed to in writing,
 * software distributed under the License is distributed on an
 * AS IS BASIS, WITHOUT WARRANTIES OR CONDITIONS OF ANY
 * KIND, either express or implied.  See the License for the
 * specific language governing permissions and limitations
 * under the License.
 */

/*
 * Copyright (c) 2018, Open AI Lab
 * Author: chunyinglv@openailab.com
 */

#include <unistd.h>
#include <iostream>
#include <iomanip>
#include <string>
#include <vector>
#include "opencv2/imgproc/imgproc.hpp"
#include "opencv2/highgui/highgui.hpp"
#include "tengine_c_api.h"
#include <sys/time.h>
#include <stdio.h>
#include "common.hpp"

#define DEF_PROTO "models/MobileNetSSD_deploy.prototxt"
#define DEF_MODEL "models/MobileNetSSD_deploy.caffemodel"
#define DEF_IMAGE "tests/images/ssd_dog.jpg"

struct Box
{
    float x0;
    float y0;
    float x1;
    float y1;
    int class_idx;
    float score;
};

// void get_input_data_ssd(std::string& image_file, float* input_data, int img_h,  int img_w)
void get_input_data_ssd(cv::Mat img, float* input_data, int img_h,  int img_w)
{
    // cv::Mat img = cv::imread(image_file);

    if (img.empty())
    {
        // std::cerr << "Failed to read image file " << image_file << ".\n";
        std::cerr << "Failed to read image from camera.\n";
        return;
    }

    cv::resize(img, img, cv::Size(img_h, img_w));
    img.convertTo(img, CV_32FC3);
    float *img_data = (float *)img.data;
    int hw = img_h * img_w;

    float mean[3]={127.5,127.5,127.5};
    for (int h = 0; h < img_h; h++)
    {
        for (int w = 0; w < img_w; w++)
        {
            for (int c = 0; c < 3; c++)
            {
                input_data[c * hw + h * img_w + w] = 0.007843* (*img_data - mean[c]);
                img_data++;
            }
        }
    }
}

// void post_process_ssd(std::string& image_file,float threshold,float* outdata,int num,std::string& save_name)
void post_process_ssd(cv::Mat img, float threshold,float* outdata,int num)
{
    const char* class_names[] = {"background",
                            "aeroplane", "bicycle", "bird", "boat",
                            "bottle", "bus", "car", "cat", "chair",
                            "cow", "diningtable", "dog", "horse",
                            "motorbike", "person", "pottedplant",
                            "sheep", "sofa", "train", "tvmonitor"};
    // cv::Mat img = cv::imread(image_file);
    int raw_h = img.size().height;
    int raw_w = img.size().width;
    std::vector<Box> boxes;
    int line_width=raw_w*0.002;
    printf("detect ruesult num: %d \n",num);
    for (int i=0;i<num;i++)
    {
        if(outdata[1]>=threshold)
        {
            Box box;
            box.class_idx=outdata[0];
            box.score=outdata[1];
            box.x0=outdata[2]*raw_w;
            box.y0=outdata[3]*raw_h;
            box.x1=outdata[4]*raw_w;
            box.y1=outdata[5]*raw_h;
            boxes.push_back(box);
            printf("%s\t:%.0f%%\n", class_names[box.class_idx], box.score * 100);
            printf("BOX:( %g , %g ),( %g , %g )\n",box.x0,box.y0,box.x1,box.y1);
        }
        outdata+=6;
    }
    for(int i=0;i<(int)boxes.size();i++)
    {
        Box box=boxes[i];
        cv::rectangle(img, cv::Rect(box.x0, box.y0,(box.x1-box.x0),(box.y1-box.y0)),cv::Scalar(255, 255, 0),line_width);
        std::ostringstream score_str;
        score_str<<box.score;
        std::string label = std::string(class_names[box.class_idx]) + ": " + score_str.str();
        int baseLine = 0;
        cv::Size label_size = cv::getTextSize(label, cv::FONT_HERSHEY_SIMPLEX, 0.5, 1, &baseLine);
        cv::rectangle(img, cv::Rect(cv::Point(box.x0,box.y0- label_size.height),
                                  cv::Size(label_size.width, label_size.height + baseLine)),
                      cv::Scalar(255, 255, 0), CV_FILLED);
        cv::putText(img, label, cv::Point(box.x0, box.y0),
                    cv::FONT_HERSHEY_SIMPLEX, 0.5, cv::Scalar(0, 0, 0));
    }
    // cv::imwrite(save_name,img);
    // std::cout<<"======================================\n";
    // std::cout<<"[DETECTED IMAGE SAVED]:\t"<< save_name<<"\n";
    // std::cout<<"======================================\n";
}

int main(int argc, char *argv[])
{
    const std::string root_path = get_root_path();
    std::string proto_file;
    std::string model_file;
    std::string image_file;
    std::string save_name="save.jpg";

    int res;
    while( ( res=getopt(argc,argv,"p:m:i:h"))!= -1)
    {
        switch(res)
        {
            case 'p':
                proto_file=optarg;
                break;
            case 'm':
                model_file=optarg;
                break;
            case 'i':
                image_file=optarg;
                break;
            case 'h':
                std::cout << "[Usage]: " << argv[0] << " [-h]\n"
                          << "   [-p proto_file] [-m model_file] [-i image_file]\n";
                return 0;
            default:
                break;
        }
    }


    const char *model_name = "mssd_300";
    if(proto_file.empty())
    {
        proto_file = root_path + DEF_PROTO;
        std::cout<< "proto file not specified,using "<<proto_file<< " by default\n";

    }
    if(model_file.empty())
    {
        model_file = root_path + DEF_MODEL;
        std::cout<< "model file not specified,using "<<model_file<< " by default\n";
    }
    if(image_file.empty())
    {
        image_file = root_path + DEF_IMAGE;
        std::cout<< "image file not specified,using "<<image_file<< " by default\n";
    }

    // init tengine
    init_tengine_library();
    if (request_tengine_version("0.1") < 0)
        return 1;
    if (load_model(model_name, "caffe", proto_file.c_str(), model_file.c_str()) < 0)
        return 1;
    std::cout << "load model done!\n";

    // create graph
    graph_t graph = create_runtime_graph("graph", model_name, NULL);
    if (!check_graph_valid(graph))
    {
        std::cout << "create graph0 failed\n";
        return 1;
    }

    // input
    int img_h = 300;
    int img_w = 300;
    int img_size = img_h * img_w * 3;
    float *input_data = (float *)malloc(sizeof(float) * img_size);
    cv::VideoCapture capture(1);
    capture.set(CV_CAP_PROP_FRAME_WIDTH, 1920);
    capture.set(CV_CAP_PROP_FRAME_HEIGHT, 1080);
    cv::Mat frame;

    int node_idx=0;
    int tensor_idx=0;
    tensor_t input_tensor = get_graph_input_tensor(graph, node_idx, tensor_idx);
    if(!check_tensor_valid(input_tensor))
    {
        printf("Get input node failed : node_idx: %d, tensor_idx: %d\n",node_idx,tensor_idx);
        return 1;
    }

    int dims[] = {1, 3, img_h, img_w};
    set_tensor_shape(input_tensor, dims, 4);
    prerun_graph(graph);

    int repeat_count = 1;
    const char *repeat = std::getenv("REPEAT_COUNT");

    if (repeat)
        repeat_count = std::strtoul(repeat, NULL, 10);

    float *outdata;
    int out_dim[4];
    while(1){
        struct timeval t0, t1;
        float total_time = 0.f;

        capture >> frame;

        for (int i = 0; i < repeat_count; i++)
        {
            get_input_data_ssd(frame, input_data, img_h,  img_w);

            gettimeofday(&t0, NULL);
            set_tensor_buffer(input_tensor, input_data, img_size * 4);
            run_graph(graph, 1);

            gettimeofday(&t1, NULL);
            float mytime = (float)((t1.tv_sec * 1000000 + t1.tv_usec) - (t0.tv_sec * 1000000 + t0.tv_usec)) / 1000;
            total_time += mytime;

        }
        std::cout << "--------------------------------------\n";
        std::cout << "repeat " << repeat_count << " times, avg time per run is " << total_time / repeat_count << " ms\n";
        tensor_t out_tensor = get_graph_output_tensor(graph, 0,0);//"detection_out");
        get_tensor_shape( out_tensor, out_dim, 4);
        outdata = (float *)get_tensor_buffer(out_tensor);

        int num=out_dim[1];
        float show_threshold=0.5;
        post_process_ssd(frame, show_threshold, outdata, num);
        cv::imshow("MSSD", frame);
        if( cv::waitKey(10) == 'q' )
            break;
    }

    postrun_graph(graph);
    free(input_data);
    destroy_runtime_graph(graph);
    remove_model(model_name);

    return 0;
}
报错,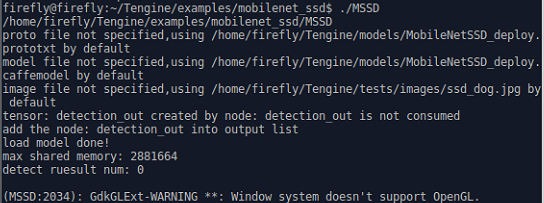
烧录的系统没带opengl,没法调用opencv的imshow,树莓派也有一样的问题,安装 libgl1-mesa-dri 然后重启板子就能解决。
sudo apt-get install libgl1-mesa-dri
sudo reboot
本篇文章中我们在RK3399上搭建了Tengine平台并试运行了MobileNet SSD网络,接下来我们将细致解析MobileNets分类网络和SSD目标检测框架,最后进一步解析源码作者chuanqi305是如何把MobileNets和SSD结合起来的。
随后还将结合实际的使用场景,尝试对MobileNet-SSD的网络结构以及训练参数细节进行分析优化~